meta data for this page
![]()
Back to Table of Contents | Previous: Getting Started | Next: Attendees
Conference
 The Conference section on the left-hand Navigation Menu will allow you to set up most of the important information your account will need to get your conference running as smoothly as possible! Here, you will be able to set up the following:
- Setup - The Setup section will allow you to input basic information for your conference. This will generally be your first stop when setting up your conference. Here, you will be able to name your conference, set your conference dates, enable or disable online registrations for your attendees and exhibitors, and much more!
- Sessions - Sessions are the events, workshops, or seminars that you will be providing your guests during your conference. By setting these up through Conference Tracker, you will be able to create an organized schedule for all of your workshops. You will also be able to keep track of guest attendance at each workshop.
- Maps - Creating a map will help your attendees navigate your conference with ease using their Attendee app. You can upload your map and add important markers.
- Sponsors - Quickly view the list of sponsors at the conference!
NOTE: This option will only appear after an Exhibitor Company has been listed as a Sponsor. - Virtual Exhibit Hall - The Virtual Exhibit Hall gathers all of the Exhibitors and Sponsors and showcases their virtual booths, which contain information, resources, and meeting links.
- Ad Center - Use the Ad Center to quickly create ads throughout your event space.
- Conference Evaluation - Quickly set up a survey for gathering feedback on how your event went from Attendees.
- Prospects - This section allows you to create scheduled emails to market your conference to potential guests and visitors (referred to as Prospects). This is a great marketing tool that you can use to promote your event!
- Administrators | Presenters | Moderators | Operators - These are the different user roles you can apply to your conference staff. They will help you organize and run your conference as smoothly as possible. Users can have more than one role if needed. Each of these roles will be further explained below.
Below you can find more detailed instructions on how each of these features works.
Setup
 The Setup section will allow you to input the most basic information for your conference. This will generally be your first stop when setting up your conference. Here, you will be able to name your conference, set your conference dates, enable or disable online registrations for your attendees and exhibitors, and much more!
The Setup section allows you to enter the following (* = Required):
- Title*: This is a required field, enter the name of your conference that will appear in the app for Attendees and at the top of the webpage.
- Subtitle: Complete with the slogan for the conference that will appear in the app for Attendees and at the top of the webpage.
- Conference Description: Write a description for your conference. This will be displayed in the Info section of the Attendee app. This editor is a WYSIWYG (pronounced “wiz-ee-wig”) editor or program, it allows a user to see what the result will look like while the interface or document is being created. WYSIWYG is an acronym for “what you see is what you get”, you can enter both text and multimedia.
- Conference Logo: Upload an image as the Conference Logo, that will be used in the App for Attendees (any regular format like JPEG, PNG, or JPG works).
- Time Zone*: Set your Time Zone that the conference is taking place in so when you import the data it will sync with mobile devices properly. If you do not find your time zone in the list then deselect the option “Show U.S time zones only”, this way you can see all time zones and select from there.
- Attendance Mode*: If you have purchased Conference Tracker's virtual component, then you can use this setting to choose your event's attendance method: either On-site, Online, or Mixed (Hybrid).
- Conference Dates*: Set up the start date (this is a required field), and the dates that the conference is going to take place on so the Attendees can see what is happening on these days and so you can schedule workshops/sessions on these days.
- Location: Add the address where this Conference will take place so the Attendees can get directions, find local places of interest, and more from the Conference Attendee app.
- Website: Add the conference or organization website that will appear in the app for Attendees.
- Social Networks: Here, you can add all of the appropriate social network links to your conference or organization.
- Contact Information: Use this section to add an email and/or phone number as the main point of contact for your attendees.
- Banner: The Banner section allows you to upload a banner that will be displayed when your Attendees visit your Public Conference Website. The suggested width is 1200 pixels.
- Hotel Reservation Link: If you are offering any hotel reservation offers via a custom URL, you can add them here. This will be displayed on the Public Conference Website.
- Session Tracks: Enabling this option will allow you to group your sessions into categories. Tracks will be explained in greater detail in the Sessions section below.
- Online Registration: This section allows you to enable the online registration form for Attendees and/or Exhibitors. You can also use these settings to end registration for your event.
- Attendee Portal: Use this option to enable or disable the Attendee Portal. The Attendee Portal refers to the Conference Attendee Mobile App and the Attendee Web Portal (accessed via a web browser). When disabled, Attendees will not be able to access either of these systems.
- Exhibitor Portal and Leads App (if purchased): Use this option to enable or disable the Exhibitor Portal. The Exhibitor Portal refers to the Conference Leads Mobile App and the Exhibitor Web Portal (accessed via a web browser). When disabled, Exhibitors/Sponsors will not be able to access either of these systems.
- Other Features Visibility: Here, you can turn off any features you may not be using during your Conference. Turning off any of these features simply removes them from the Navigation Menu, making the menu more compact. You can always turn any of these features back on if needed. The features that can be turned off include Check-In, Handouts, Invoices, Badges, Certificates, and CEU Reports.
Once you have set the previously mentioned information you must click the Save Changes button for the changes to be set.
Public Conference Website
 At the top of this page, you will see a yellow banner with the following message:

The public conference website this message refers to is a landing page for all registrants of your event. This website includes information about your Conference, such as event dates, location of the event, session schedules, sponsors, exhibitors, and much more! As the message states, to view this page, log out of Conference Tracker first, then visit the link shown on this message. Your registrants will be able to fill out the registration form from this page as well. This is a great way to market your conference!
Note: The link in this box will be unique with each account, so make sure to take note of it before logging out!
Sessions

Sessions are the events, workshops, or seminars that you will be providing your guests during your conference. By setting these up through Conference Tracker, you will be able to create an organized schedule for all of your sessions. You will also be able to keep track of guest attendance at each session.
In this section, you can manage your Sessions for your conference. Near the top of this screen, you'll see a few buttons that will assist with your Session creation:
- Create: This button will allow you to manually create a new session for your conference.
- Rooms: This button will allow you to view and create the rooms where your sessions will take place. Rooms are extremely helpful when organizing your sessions. You can Create Sessions, Rooms, and Tracks by pressing the buttons labeled as such along the top of the page. Clicking on the option “Import Sessions” allows you to import .csv files that will expedite the session creation process (see: Conference Tracker - Session/Workshops Import). Under these buttons, you will see a Search Filters section. These filters will help you navigate through your sessions quicker by allowing you to filter by Date, Track, or Attendance Mode.
There are two quick methods to edit your sessions: you can either click on their title and then click on the green Edit button that appears on the right-hand side of the page, or you can click on the three dots button to the right of the session title and click Edit. In this same menu shown by the three dots button, you will be able to use the following options:
- Registration - Use this option to see which Attendees are registered for this Session/Workshop.
- Setup Streaming - Use this option to quickly set up the streaming settings for your virtual sessions.
- Upload Video - Use this option to upload a recording for your Virtual/Hybrid Sessions.
- Preview Streaming - Use this option to preview your streaming for your virtual sessions. If you have uploaded a video to your virtual session, this will allow you to preview how it would look once your session goes live.
- Watch Streaming - Use this option to watch your streaming for your virtual sessions.
- Download Video - Use this option to download the Session Video.
NOTE: This option will only appear after a Virtual Session is over. - Details - Use this option to get an attendance report and statistics about the session.
- Delete - Use this option to remove the Session from the conference.
NOTE: The Setup Streaming and Preview Streaming options will only appear if your account has the Virtual Package enabled and the specific session is set to Online or Mixed mode.
Create Session
 To manually enter a session/workshop you click on the blue Create button from the Sessions screen. You will then be presented with a screen with the following fields (* = Required):
- Name* - This is the name of the workshop that you want to appear on the app for mobile devices and in the Conference reports.
- Description - Optionally give this workshop/session a description which Attendees will see when choosing them on the Online Registration form.
- Start/End Date and Time *- This is the date of this workshop. When the field has been clicked, a small calendar window will pop up to help you pick your date and time for the session. If the chosen date isn't a date when the conference is taking place, it will be added to the Conference Dates under your Conference Setup section.
- Location/Room* - This is the Room that this workshop will take place. You can search through all available rooms here. If no rooms have been created, you will not be able to finish your session successfully. Always create rooms before-hand!
- Fee - This is the optional fee that can be added for signing up to attend this class from the Online Registration form.
- Capacity - This is to let the system know how many Attendees can sign up for the workshop/session before it becomes full on the Online Registration form. (Note: This field only shows up if you have enabled Online Session Registration in the Advanced Settings.)
- Available for Online Registration - This toggle will allow you to enable this specific session for Online Session Registration. (Note: This field only shows up if you have enabled Online Session Registration in the Advanced Settings.)
- Credits - This item states how many credits the Attendee will earn if meeting the attendance requirements of this workshop/session.
- Require Sign-out - Check this off if you want the Attendees to have to swipe out at the end of the session.
- Require Passing a Quiz - Enabling this option allows you to create a Quiz for your Attendees to take once they participate in a session. If this Quiz is not passed by an Attendee, then they will not receive credit for the Session, even if they attended it for the required presence amount.
- Quiz Passing Score - If you have enabled the Quiz for your Session, you can set the minimum percentage that an Attendee must receive to pass the Quiz and obtain credits for the session.
- Required Presence (Percentage or Minutes) - This is the percentage of time they must have been signed-in; meeting this requirement to obtain the credits for this workshop/session. You have three different options here: Required Presence (Percentage), Required Percentage (Minutes) and No required session time. You can use either of these fields for your required presence. As long as this requirement is met, then the attendees will receive credit for their attendance.
- Tracks - With Tracks, you can group your sessions with custom-created categories.
- Presenters - This is an optional field to specify the person speaking at the workshop/session.
- Attendance Mode - In the Attendance Mode section, you can designate how this session will be attended. There are three options:
- On-Site - Use this option if the session will be held on-site only.
- Online - Use this option if the session will be held online only. Turning this option on will show you additional options:
- Service - This drop-down menu allows you to select the service you will be using: a Third-Party service, such as YouTube, GoToMeeting, Zoom, etc., or our Built-In services. To find out more about our Built-In services, click here.
- Embedding - Depending on how you will be presenting your online session, this option will be used differently. Some video hosting websites, such as YouTube or Vimeo, give their users an embed code. This code allows your video to be displayed within other websites or, in this case, Conference Tracker. If your online platform of choice offers embed codes, leave this option turned on. You will then see a new textbox that allows you to place your embed code. Other online video platforms, such as Zoom or GoToMeeting, do not allow their users to use embed codes. These platforms will simply give you a URL to visit externally, usually by opening a new window or tab on your web browser. If this is the case, leave the Embedded option turned off, and you will be able to add the direct URL to your Zoom or GoToMeeting session.
- Mixed - If your session is a hybrid model, meaning you are both holding the session on-site and also providing an online component to it, use this option
- Due to this session being on-site and online, you can use the Service and Embedding options as well.
- Custom Fields - This field will show if you have added any additional Custom Session Fields through the Settings of the Conference Tracker account. These Custom Fields allow you to add additional information to your Sessions.
- Quiz - In this section, if you have enabled the Require Passing a Quiz option above, you will be able to customize the questions and answers that are presented to your Attendees.
- Question - The Question field allows you to enter the question text.
- Type - Here, you can choose what type of question you will be creating. You can create a regular multiple-choice question or an image multiple-choice question.
- Correct Choice - Here, you can set which one of your choices will be the correct answer to your question.
- Choices - Here, you will be able to add and edit the choices you will be providing your Attendees. Depending on your question type, you will either customize the text of the option or upload an image for each option. To add additional choices, simply click on the Add Choice button on the bottom right area of this section.
Quizzes
 As mentioned above, Conference Tracker can add a Post-Session Quiz to any of your Sessions. This Quiz will be tied to the Session's credit, meaning that an Attendee must pass this Quiz to receive credit for their session attendance. To set these Quizzes up:
- On the left-hand Navigation Menu, click on Conference → Sessions.
- You can either create a new session by clicking the blue Create button near the top of the Sessions List or edit any of your previously created Sessions by clicking on the Session's title.
- Once you are in the Edit Session screen, look for the Quiz section. You will see an option labeled Require Passing a Quiz. Enable this option.
- Under this option, you will see the Quiz Passing Score setting. Here, you can set the passing score for the quiz.
- To add questions to your quiz, scroll to the bottom of the page and you will see the Quiz section.
- There will be one Question entered by default. You can change the text of the question, the type (either text multiple-choice or image multiple-choice), the correct answer for your question, and the choices you will be providing.
- To add more questions, simply click on the Add Question button near the bottom of this section.
- Once you are finished, click on the green Save Changes button at the bottom of the page.
Quizzes will only be triggered once an Attendee has visited a Session. To take the quiz, they simply need to visit the Attendee Dashboard on the web browser version of Conference Tracker (www.conftrac.com). This can be accessed via a desktop/laptop browser, or a tablet/phone web browser. The quiz will not be available on the Conference Attendee app. On the home page of the Conference Attendee Dashboard, they will see a section labeled Your Attendance, which will show all of the sessions they have attended. If any of these sessions have a Quiz attached to them, they will see a blue button labeled Take Quiz. Simply click on this button and they will be taken to the Quiz! Once they are finished with the Quiz, they will be automatically graded.
Rooms
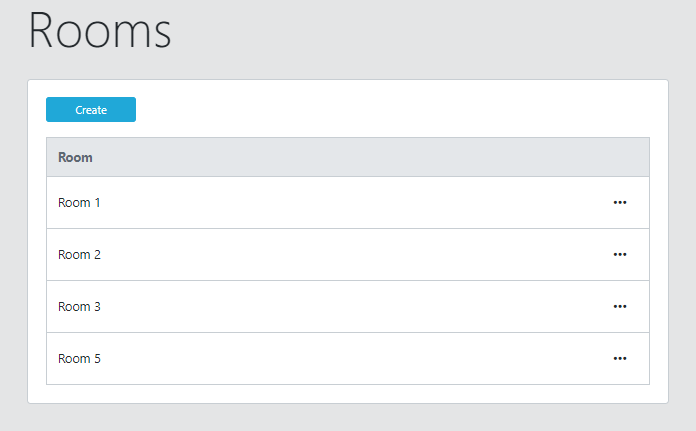 The Rooms section will allow you to create the actual locations where your sessions will be taking place. This will help your attendees find each session with ease, help you organize your sessions, and help your operators/scanners find each session quicker on their Conference Tracker app.
From the Conference → Sessions screen, clicking on the Rooms button will take you to a screen where you can see a list of all the rooms you have created. If you have not started creating rooms this can be done by clicking on the Create button.
The Rooms section will allow you to create the actual locations where your sessions will be taking place. This will help your attendees find each session with ease, help you organize your sessions, and help your operators/scanners find each session quicker on their Conference Tracker app.
From the Conference → Sessions screen, clicking on the Rooms button will take you to a screen where you can see a list of all the rooms you have created. If you have not started creating rooms this can be done by clicking on the Create button.
- Create - Clicking on the Create button on the Rooms screen will take you to the Room Creation page. To create a new room, simply fill in the name and location of the room and click Save. Note: Both of these must be filled out.
- Delete - To delete a room, click on the three dots at the far right of any room name. This will bring up the Delete Room option.
Tracks
 Tracks are a way to organize your sessions, for both yourself and your attendees. They work like a grouping system for your sessions. You can create multiple tracks and list one or more sessions under each. These will then be grouped under a Track title and can be offered to your attendees as a specific pack of sessions when registering. Tracks are optional and can be enabled/disabled under the Setup screen in the Conference section of the Dashboard.
- Create - This will take you to the Create Track screen, which will ask for the color of your track, a title, and a description.
- Delete - To delete a track, click on the three dots at the far right of any track name. This will bring up the Delete Track option.
Schedule at a Glance
 Creating a schedule can help your Attendees quickly see the Conference itinerary without having to scroll through a list of Sessions.
Creating Events
 To begin creating Events for your Schedule, simply click on the Add an Event button on the top left of this page. Then follow these steps:
- Enter a date for the event.
- Enter a Start Time for the event.
- Enter an End Time for the event.
- Enter a Description for the event.
- Click the Save Changes button on the bottom of the page once you're done.
Customizing & Publishing
 Now that you have your Schedule built out, it's time to customize the appearance and publish it for all to see.
By clicking the Edit Appearance button, you have the option to change the Background color and the Font color of the Schedule. As well, you can quickly reset it back to the original Conference Tracker colors by hitting the Reset button. Once done, be sure to Save Changes at the bottom of the page.
Clicking the Publish button on the main Schedule page will publish the schedule to both the web portal view for Attendees, as well as the public Conference Landing page. The link to this page can be found at the top of the Conference> Setup screen.
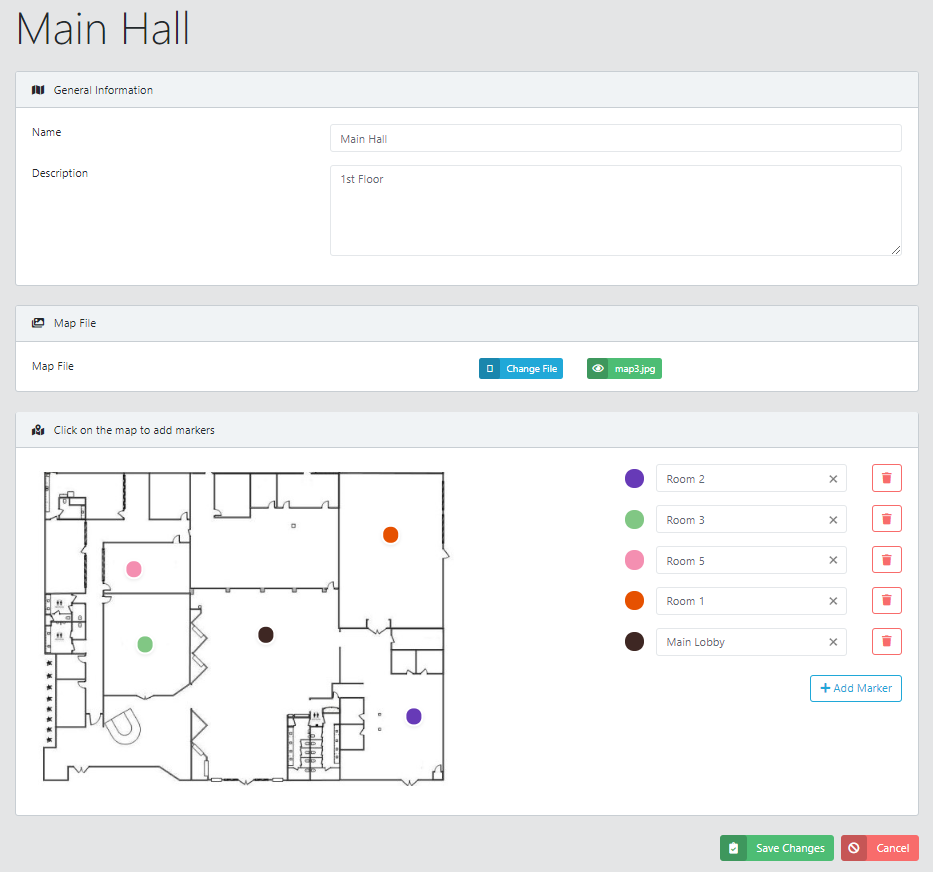
Maps
 Creating a map will help your attendees navigate your conference with ease using their Attendee app. You can upload your map and add important markers. You can also have different maps to showcase different floors or sections of your conference. For example, you can have the main map that shows each session room's location, and you can have a second map that only shows the Exhibit Hall with all of your Exhibiting Companies.
In this section, you can upload either an image or a document file to be used as a map for the attendees. These maps can only be accessed by attendees using the Attendee app.
Create a Map
 To begin creating a new map, simply click on the Create button on the top left of this page. Then follow these steps:
- Enter a name for the map. This will be displayed on the Attendee app for your attendees to see.
- Optionally, you can enter a description for the map.
- Upload a file to be used as the map. You can upload standard image file types (such as .jpg or .png) and even PDFs.
- Click the Save button on the bottom of the page once you're done.
Markers
You also can place markers on maps. Markers help you label important points on your maps, such as Rooms or Exhibitors. Attendees can see markers you've placed on the map by accessing the map from the Attendee app. To begin creating a marker, click on one of your available maps from the Maps page.
From here, you should be able to see a preview image of the map. To create a marker, follow these steps:
- Click anywhere on the image to begin creating a marker. A new marker will appear. You can also create a new marker by clicking on the Add Marker button on the right-hand side.
- On the right-hand side, you will see the marker you just created with a color and a name.
- You can change the name of the marker by changing the text in the field marked Specify room, company, or label.
- You can change the color of the marker by clicking on the marker itself and choosing a new color from a preset list of colors.
- When you're done, click Ok to finish setting up your marker.
You can move your marker around the map by clicking and dragging it.
To remove a marker, click on the red Trash Can icon next to the name of the marker.
Click on Save at the bottom of the page once you're done making changes to your map.
Watch a short video on how to create a Map

Delete a Map
To delete a map, you have two options:
- On the main Maps page, look for the map you would like to delete. On the far-right end, there will be three dots. Clicking on these three dots will give you the option to delete this map.
- On the main Maps page, click on the map you would like to delete. Once the new page has loaded, you can see a red Delete button towards the top of the page. Clicking this will also delete the map.
Virtual Exhibit Hall
The Virtual Exhibit Hall gathers all of the Exhibitors and Sponsors that are part of your event and places them in a virtual hall where Attendees can quickly view their virtual booths. The virtual booths are generated automatically as Exhibitors and Sponsors edit their company profiles via their accounts. For more information on what data is included in these virtual booths, please click here.
Conference Evaluation
 The Conference Evaluation section allows you to quickly create a survey to collect feedback from Attendees regarding the overall performance of your Event. This evaluation comes pre-built with a recommended template, as well as the ability to customize it to your liking.
Create Evaluation
In the Create Evaluation section, you will be able to edit, customize, and schedule the survey that goes out to Attendees at the end of your Event.
- Name* - Here you would give your Evaluation a Title.
- Answers are anonymous - This toggle will determine whether or not you can see who submitted which answers to your Evaluation.
- Background and Foreground Color - These options will allow you to customize the color scheme of the Evaluation seen by Attendees.
- Publish On - Schedule the Date and Time that your Evaluation will be sent out.
- Use Template - This is a pre-built template of suggested questions to maximize Attendee Feedback.
- Start from Scratch - This will allow you to customize your Evaluation from a blank slate.

Manage Evaluation
 This screen will allow you to Edit the previously created Evaluation, Publish it manually, View the Results, or Delete it.
View Results
 This is where you can quickly view the results of your previously published Conference Evaluation. You will be able to see information such as Total Responses, Participation Rates, and General Information about the Evaluation. Underneath, you will see your questions listed with handy graphs showing you the percentages of responses per question in either Bar Graph, Pie Chart, or Table form. Changing this display from Chart to Table will allow you to click on the individual answer count to see the individual Attendees who selected each answer choice.
Advertisement (Ad) Center
The Ad Center allows you to create different types of advertisements that will appear throughout the Attendee Web Portal and the Conference Attendee App. When you visit the Ad Center, you will see two options: the Attendee Portal Ads and Push Ads.
Attendee Portal Ads
In the Attendee Portal Ads section, you can view and create all the advertisements that you have generated for your conference. These ads will be shown to Attendees that are visiting your event space via the Web Portal and the Conference Attendee App. This screen also shows how many Views and Clicks each ad has. Clicking on any of the Ads will allow you to edit them as well.
Create an Ad
Clicking on the blue Create button will allow you to create a new ad for your event space. (* = Required):
- Name* - Here, you can name the ad you are creating. This won't show up to your Attendee App users, so it will be mainly used for organizational purposes.
- Type* - In the Type field, you can choose what type of ad you would like to create. You will be able to pick from Banner, Pop-up, Survey Results, Session Streaming, and Virtual Exhibit Hall. When you choose any of these, you will be able to see a preview of where they would be placed and what they would look like at the bottom of the page.
- Priority* - If you have more than one ad of the same type, they will cycle throughout the usage of the Attendee app or Attendee Web Portal. With the Priority field, you can set the order that they cycle through. A higher number means higher priority, which will set the ad to show up before other ads with a lower priority.
- Company* - This allows you to tie a company to each of your created Ads. This is what will determine what profile the ad will load when clicked if there is no website set for the ad.
- URL - When an ad is clicked, it will take the Attendee to the Company Profile on Conference Tracker. If you would like to redirect them to an external URL when the ad is clicked, use the URL field to designate the URL you would like to use.
- Image/Video* - You can upload an image or video (if allowed by the type of ad) by using this section.
- Background Color - If the ad or video does not fill out the entire space given for the ad, then it will have a colored background. You can use this setting to choose the color chosen. If left blank, then the color will be white.
Push Ads
 Push ads are notifications that an Exhibitor Administrator who has purchased a Conference Leads license can purchase from a conference admin. A push ad works like a notification. Once an exhibitor has purchased a push ad, they will be able to customize the title and message sent to conference attendees. Once they press send, all attendees will receive this notification. If any attendee presses on the notification itself, they will be taken to the company profile that the exhibitor represents, where they can then choose to contact the company.
Prospects
The Prospects section is a great marketing tool for your conference. Here, you can create multiple Prospects that can be labeled as potential Attendees and/or Exhibitors. You can then create and schedule customized emails that promote your conference to these Prospects. Conference Tracker keeps track of all of these Prospects, providing you with stats on how many Prospects have registered for your conference via the Prospects Emails, how many have unsubscribed, and other great features.
On the main Prospects page, you will see a list of all of your created Prospects. There is also a Search Filter section, which helps you easily find and navigate through your Prospects. You will also see two buttons; the blue Create button and the Email Notifications button.
Create Prospect
Clicking the blue Create button takes you to the Create a New Prospect page, allowing you to enter all of your Prospects information. (* = Required)
- General Information - Here, you can input your user's First Name*, Middle Name, Last Name*, Email Address*, and Role*. The Role field allows you to designate whether this Contact is a potential Attendee or Exhibitor. This will come in handy since you can create different Contact Emails that target individual Roles.
- Photo - Use this section to upload a photo for your newly created contact.
- Subscription to E-mail Notifications - Here, you can view the Subscription status of each contact. By default, they will be Subscribed to your Contact emails. If they choose to Unsubscribe, this option will update to reflect that status. You can also manually change this setting.
- Contact Information - In this section, you can fill out your user's contact information. This includes Phone Number, Street Address, City, State, Zip Code, and Company.
- Social Networks: Here, you can add all of the appropriate social network links for your contact.
- Title and Bio - Here, you can fill out your user's Title and their Bio.
Once you have entered all of the necessary information, press the Save Changes button to create the Attendee.
Email Notifications
After you have created your Prospects, you can start to create the Email Notifications that will be sent to them. To access your Email Notifications, click on the Email Notifications button on the main Prospects page. Here, you will see a list of all of your already created contact email notifications, along with some search filters to help you organize your emails. You will be able to see general information about each of your created emails, such as if the email is targeted for Attendee Prospects or Exhibitor Prospects, the date it has been scheduled for, and if the email is enabled. You can also delete any of your email notifications by clicking on the three dots found at the end of any of your emails. To create a new Email Notification, you can click on the blue Create button found on this page.
Create Email Notification
To create a new Email Notification, click on the blue Create button found on the Email Notifications list. In the Create A New Email Notification screen, you will be able to edit the following information for your email notification (* = Required):
- Name* - Here, you can provide a title for your email notification. This will only be used for Conference Tracker, so none of your contacts will be able to see this title.
- Role - In the Role section, you can choose what type of contact this email notification will target: Attendee Contacts, Exhibitor Contacts, or both.
- From - The From section allows you to change the name of the sender of the email notification.
- Reply-To* - Here, you can change the Reply-To email address, just in case any of your attendees reply to the email notification
- Subject* - The Subject field allows you to edit the Subject of the email notification.
- Body* - Here, you can fully edit the message included in your email notification. The body editor has font and formatting settings. There is also a list of keywords supported by Conference Tracker found below the Body field that allows you to customize your email notification message even more.
- Scheduled Date - The Scheduled Date field allows you to set the date for when your email notifications are automatically sent out.
- Enabled - You can turn the Enabled option on to activate this email notification.
Once you are finished editing your email, click on the green Save Changes button at the bottom of this page.
Conference Staff
The Conference Staff will be all of the users that will be helping you out with your conference. Conference Staff includes the following roles: Administrators, Presenters, Moderators, and Operators. These are the different user roles that will help you organize and run your conference as smoothly as possible. Each of these roles will be further explained below.
NOTE: You can always assign multiple roles to a single user. When creating a user, in the Role section, you can add as many roles as you'd like. For example, if you have a Presenter who would like to also attend sessions, you can have this user have the roles Presenter and Attendee.
Administrators
 In this section, you can create and manage Administrators for your conference. Users with the Administrator role have access to everything on the Conference Tracker website. They can change any settings and create any data.
Create: Clicking on the Create button will allow you to create a new Administrator. For more information on how to create users, click here.
Groups: Clicking on the Groups button will take you to the Groups section. For more information on Groups, click here.
To access the following options, you will need to click on the three dots at the far right of any Administrator's name. These options are specific for only the chosen Administrator:
Edit: To edit any Administrators, click on any of their names on this page and it will take you to the Edit page.
Send Login Info: This will send the selected Admin their Login Information.
Send Profile Update Invitation: This will send the selected Admin an email inviting them to update their profile information.
Groups: This option will show any Groups the chosen Administrator belongs.
Delete: This option will Delete the chosen Administrator.
Presenters
 Presenters will be users that will be leading/speaking at a session. Presenters have very limited access to the website. They can view sessions and post information to their session's social feed.
Create: Clicking on the Create button will allow you to create a new Presenter. For more information on how to create users, click here.
Groups: Clicking on the Groups button will take you to the Groups section. For more information on Groups, click here.
To access the following options, you will need to click on the three dots at the far right of any Presenter's name. These options are specific for only the chosen Presenter:
Edit: To edit any Presenters, click on any of their names on this page and it will take you to the Edit page.
Send Login Info: This will send the selected Presenter their Login Information.
Send Profile Update Invitation: This will send the selected Presenter an email inviting them to update their profile information.
Groups: This option will show any Groups the chosen Presenter belongs.
Delete: This option will Delete the chosen Presenter.
Moderators
 In this section, you can create and manage Moderators for your conference. Users with the Moderator role have full control of the social feeds found on the Conference Attendee app. They can post, upload, and delete posts. Their main role is moderating each post to ensure that they are up to standard with the conference.
Create: Clicking on the Create button will allow you to create a new Moderator. For more information on how to create users, click here.
Groups: Clicking on the Groups button will take you to the Groups section. For more information on Groups, click here.
To access the following options, you will need to click on the three dots at the far right of any Moderator's name. These options are specific for only the chosen Moderator:
Edit: To edit any Moderators, click on any of their names on this page and it will take you to the Edit page.
Send Login Info: This will send the selected Moderator their Login Information.
Send Profile Update Invitation: This will send the selected Moderator an email inviting them to update their profile information.
Groups: This option will show any Groups the chosen Moderator belongs.
Delete: This option will Delete the chosen Moderator.
Operators
 In this section, you can create and manage Operators for your conference. Users with the Operator role can log into the Conference Tracker app to scan attendees.
Create: Clicking on the Create button will allow you to create a new Operator. For more information on how to create users, click here.
Groups: Clicking on the Groups button will take you to the Groups section. For more information on Groups, click here.
To access the following options, you will need to click on the three dots at the far right of any Operator's name. These options are specific for only the chosen Operator:
Edit: To edit any Operators, click on any of their names on this page and it will take you to the Edit page.
Send Login Info: This will send the selected Operator their Login Information.
Send Profile Update Invitation: This will send the selected Operator an email inviting them to update their profile information.
Groups: This option will show any Groups that the Operator belongs to.
Delete: This option will Delete the chosen Operator.
Back to Table of Contents | Previous: Getting Started | Next: Attendees