meta data for this page
ACCUTRACK USERS SETUP
When you click on Users from the Main Menu, you will see the following options.
NOTE: Depending on your version, this option may be labeled as “Students”.
- Students: Use to set up students’ data.
- Tutors: Use to set up tutor’s data.
- Instructors: Use to add or edit instructors.
- System Administrators: Use to set up system administrators and assign them an access group.
- Student Groups: Allows you to view and manually build student groups. These groups can be used as filters in several places in the system.
- Student-Athletes: Allows you to create sports and then register students in them. You can also create the required hours for members of these teams.
- Grants Recipients: Allows you to create grant definitions and then assign them to students.
- Tutor Groups: Allows you to view and manually build tutor groups. These groups can be used as filters in several places in the system.
The following sections contain more information on the above screens.
STUDENTS
Purpose: To add a new student or modify the information for existing students.
Access: Users » Students

You will notice a list of students sorted alphabetically by the last name. The list box has four columns. The first column shows the student’s last name, first name, and middle name. The second column shows the student’s sign-in ID. The third column shows the user’s status. A “Yes” in the Active column indicates the user is active, while a “No” indicates an inactive user. The fourth column shows the secondary (Card ID that can be used for the student as an alternate sign-in credential.
NOTE: The Card ID option for students is enabled in the Control Panel » ID Settings Options screen.
Adding a Student
To add a new student, simply click the Add button and then fill in his or her ID number and name. You can also fill in the contact info and also click the Profile button to answer the profile questions. Click the “Save” button to save your entry.
If the user ID you are saving is already in the database, you will see a warning message, and you will not be allowed to save the duplicate ID.
 If the name you are entering matches another name in the database, you will see a warning message. However, you will be allowed to save the duplicate name if it has a different user ID number.
 Click on the “Yes” button to save the record, or click on the “No” button to cancel.
Editing a Student
To edit a student record, first, highlight the name by clicking on it. If you don’t see the name, use the up  and down
  buttons in the vertical scroll bar, or the scroll bar itself to find it. You can also click in the grid area under student name or student ID and start typing the last name or Student ID to find the record. To edit the record, click on it and then click the “Edit” button. You can also double click on the record to go into edit mode. The student’s info will be copied to the text boxes and become editable. Make your changes and then click the “Save” button to keep the changes, or click on the “Cancel” button to keep the data as is.
Making a Student Inactive
To inactivate a student, edit the student as described above, uncheck the “Active” checkbox, and save the record. When the student is inactive, a “No” will appear in the active column of the list box. Inactive students are not allowed to sign in, however, you can still run reports on them.
Hide Inactive Students (Pin)
If you inactivate students not in the import file when performing a Student Information import or set students to inactive manually, you can now hide and pin the student view grid to show inactive students or not.
When the pin is like this, it is in an unpinned state:
 To hide inactive students, click the checkbox. If you want to pin to always hiding inactive students, click the checkbox and then click the pin. It will then display in a pinned state.

Deleting a Student
To delete a student, first, highlight the name, and then click on “Delete”. You will see a confirmation message:
 If you answer “Yes”, AccuSQL or AccuTrack will check the database to see if there are related records in other tables. If no related records exist, AccuSQL or AccuTrack will delete the student; otherwise, AccuSQL or AccuTrack will display a message:
 The message above says that this student has sign-in records and some messages. If you answer “Yes”, AccuSQL or AccuTrack will delete the student's record and all related records, such as sign-in records, appointments, and messages.
Changing the capitalization of the entered names
If students enter their names during their first sign-in session, the names might have the wrong capitalization. Some names might be in all UPPER caps, or in rEVERSE caps. You can force proper name capitalization in two ways:
1) By setting the option “Force proper name capitalization…” in the Options screen.
2) By using the proper name capitalization function in the Modify Students screen.
To use the proper capitalization, click on the “Proper Case” button.
 AccuSQL or AccuTrack will display a confirmation message:
 Click “Yes” to proceed.
Show Web (Registrations)
Use this button if you have the AccuSQL or AccuTrack Web Gateway module and you allow students to register via the web. When you click on this button you will see a list of students who signed up as new students via the web. To allow these students to schedule appointments, edit these records and make them active.
Set Active/inactive
Use this button to activate or inactivate one or more students. When you click Set Active/Inactive, you will be presented with an information box about this function. Click Yes to proceed.
 In the grid select any records, you want to activate or inactivate, and then click Close. Tip: If you right-click on the Status grid for either an Active or Inactive record, you can then select “Filter on this value” » “Starts with” to show only active or inactive records:


Click Close after selecting the records you want, and then click Yes to set the selected records to Active or No to set them to Inactive.

Adding Profile Data to a Student Record
Select a student and then click the Profile button to add profile information for the student. Profile questions and answers allow you to collect additional information, such as demographic data, or anything you would like to collect about your students. When you click the Profile button, you can add or edit any of the 10 profile fields that are available.

Click save to save your selections, or Cancel to discard them.
Assign Picture
Click this button to assign a picture for the selected student. Recommended size is 200×200 pixels and you can use a .bmp, .png, .jpg or .gif file. When you click Assign Picture you will be presented with an Open Picture navigation screen where you can locate the picture you want to use and then click OK.

The selected will display on the Students screen for that student.
Attachments
Use this option to assign external files with the selected student record. When you click Attachments, a screen will open where you can click Add to add a new attachment:

Student: By default, it selects the current student you have selected on the main Students screen. If you want to select a different student, click the … button to find them.
Phone Number: System populated.
Description: Enter a name for the attachment.
Filename: Click the … button to navigate to the file you want to attach. After selecting the file click OK. Note: If it is not a Word document, change the Files of Type drop-down to see all files.
Save: Click to save the attachment link.
View: Click to view the attachment in the default program associated with it.
Print: Click to print the document. Warning: when you click Print, it will print the document immediately.
Change Password
Click this button to change the current password for the selected student. Passwords are used when students log into the Student Pad, use Web Gateway to make appointments, or use sign into the Computer Lab Plugin and you have Add-ons » Setup » Computer Lab Options set to require student password at sign-in. After you click Change Password, a screen will open where you can enter the new password and then enter it again to confirm and click Done. The passwords are case-sensitive. If you do not want to change the password, you can click the Cancel button.

Using the Students Central Toolbar

The bottom of the Modify Student screen has a toolbar that provides detailed information on the selected student. Start by selecting the student from the Students list box, and then click on one of the available buttons:
Appointments: Shows the scheduled appointments for the selected student (current semester).
Registration: Shows the activities (classes) to which the selected student is registered.
Visits: Shows the visits for the selected student (current semester).
Tutors: Shows the tutors that helped the student this semester.
Groups: Shows the student groups of which the student is a member.
Tutoring Requests: Shows the tutoring requests the selected student made this semester.
Advanced: Provides you with more control over the reports, including changing the reporting period and exporting the report to an HTML form, a Word document, or an Excel sheet.

TUTORS
Module: Users > Tutors
Purpose: Enter and modify tutors.
Access: From System Administration, click on Users > Tutors.

Adding a Tutor
To add a new tutor, Click the Add button and enter his or her ID number and enter the first and last name. You can also enter the phone number, e-mail address, and street address, among other items. The e-mail address will be used if you want to send e-mail notifications of appointments or use other types of email messaging for the tutor. The street address is useful if you want to print address labels for the tutors. The cell phone number will be used if you decide to use text messaging.
Editing a Tutor
To edit a tutor record, double click on the tutor’s name in the tutor list box on the left side of the screen. When you are done editing, click on “Save” to keep the changes or on “Cancel” to void them.
Making a Tutor inactive
Tutors you enter in the Tutors screen will show up in the Tutor selection screen during student sign-in and in the scheduling appointments screens. If you no longer wish for a tutor to appear in these screens, you can make him or her “inactive”. To do this, edit the record by double-clicking on the name in the Tutor list box, then click on the “Active” checkbox to clear it. Click on “Save” to keep the changes. You will notice “No” appearing in the Active column for this tutor.
Deleting a Tutor
To delete a tutor, select her name in the Tutor list box by clicking on it and click on “Delete”. If this tutor does not have any other related records, you will see this message:

Answer “Yes” to proceed.
Attachments
Use this option to assign external files with the selected tutor record. When you click Attachments, a screen will open where you can click Add to add a new attachment:
Student: By default, it selects the current tutor you have selected on the main Students screen. If you want to select a different tutor, click the … button to find them.
Phone Number: System populated.
Description: Enter a name for the attachment.
Filename: Click the … button to navigate to the file you want to attach. After selecting the file click OK. Note: If it is not a Word document, change the Files of Type drop-down to see all files.
Save: Click to save the attachment link.
View: Click to view the attachment in the default program associated with it.
Print: Click to print the document. Warning: when you click Print, it will print the document immediately.
Change Password
Click this button to change the current password for the selected tutor. Passwords are used when tutors log into the Tutor Pad or use Web Gateway to view or cancel appointments. After you click Change Password, a screen will open where you can enter the new password and then enter it again to confirm and click Done. The passwords are case-sensitive. If you do not want to change the password, you can click the Cancel button.

Using the Tutor Central Toolbar
At the bottom of the Tutors screen, you will see the Tutor Central Toolbar. This toolbar contains buttons that will provide more information on the selected tutor. This information includes:

Appointments: Shows this semester’s appointment for the selected tutor.
Sign-ins: Shows this semester’s sign-ins for the selected tutor.
Sessions: Shows the tutoring sessions for the selected tutor during the current semester.
Assignments: Shows the tutoring assignments for the selected tutor during the current semester.
Advanced: Shows a form that allows you more control of the reports on the selected tutor. This includes changing the reporting period (from the default ‘this semester’ period) and the ability to export the report to HTML format, Word document, or Excel sheet.

PAY RATES
Next, you can define the Pay Type for this tutor. This is useful if you want AccuSQL or AccuTrack to calculate the pay for the tutor. Select the pay rate by using the drop-down box. The default pay rate will be shown in the “Pay rate” Text box. You can change the default by typing in a different rate if needed. AccuSQL or AccuTrack will make sure the entered amount is between the minimum and maximum pay rate for this Pay Type. Next, select how the tutor is paid: For Work Hours or For Appointments by using the Pay Method options group. This definition will determine how AccuSQL or AccuTrack calculates the tutor’s pay. Note: Tutor pay rates are defined in the Tutor Visits Tracking » Pay Rates screen discussed later in detail.
ADD/REMOVE ASSIGNMENTS
Next, you need to tell AccuSQL or AccuTrack the categories/services and activities the tutors provide help with by:
- Searching for the Tutor in the list (at the top-left) and selecting them.
- Clicking the Add/Remove Assignments button and then using the Selection List Boxes control.
You must assign the activities to the tutors if you want the Student to be able to pick a Tutor when they sign-in to the system or schedule an appointment. When the student signs into the Center/Local Lab (or makes an appointment if you enable that) then the Tutors that show up in the Tutor Selection picklist are the Tutors who have the activity the Student selected assigned to them. Also, if you plan to use appointment scheduling, then you must not only set up the Tutor Activity Assignments here in this section, but must also create their Tutor Schedule (which we'll discuss later).

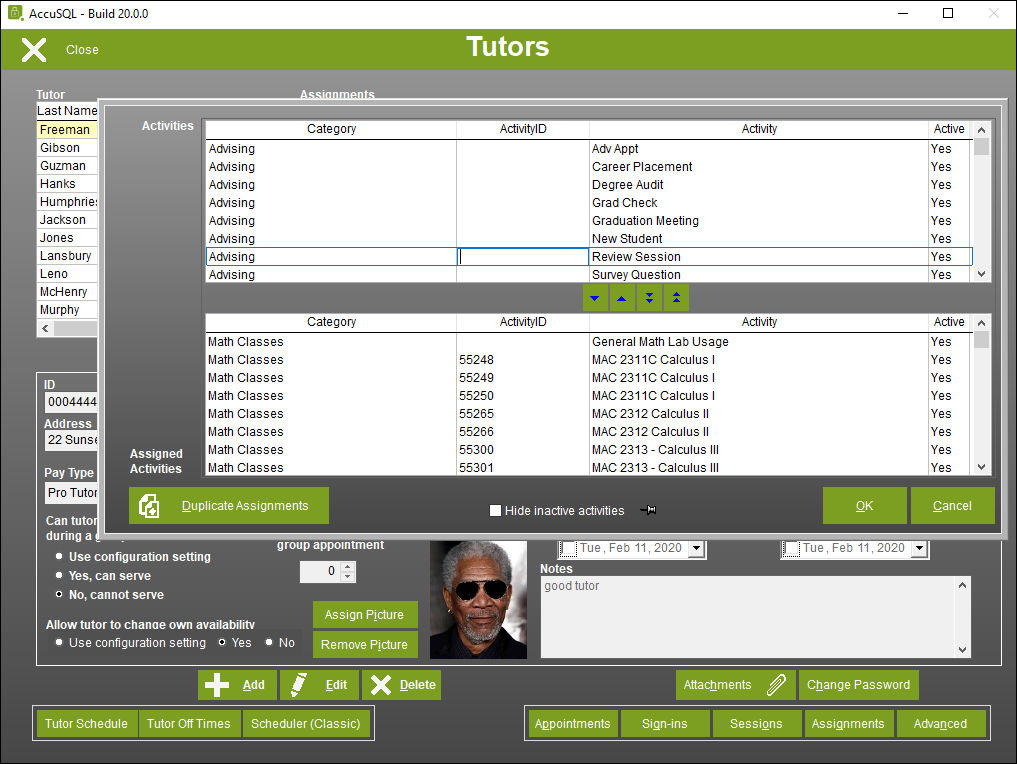
The list box at the top portion of the screen shows the available activities as you entered them (or imported them) on the Activities screen. The list box on the bottom shows the activities associated with the selected tutor. To select an activity, double click on it or use the Selection List Boxes buttons. When you are done selecting activities, click on “OK” to add them for the selected tutor. Tutor activity assignments determine, along with the tutors’ schedule, if the tutor will show up in the picklist when a student signs in and picks that activity. So if a student selects English Composition 1, for example, the tutors that have English Composition 1 as an activity assignment and also have a schedule indicating they are working will show up in the picklist when a student signs in or schedules an appointment.

By right-clicking in the top grid now, you can filter on Exact values that have a Category of “Math Classes”:

At this point, the list at the top will then only contain Activities that are assigned to the “Math Classes” Category. You can now click the first value at the top, then hold the Shift key on the keyboard, and select the last value.

And once that is done simply click the single down arrow to move all of those selected Activities to the Assigned Activities lower portion of that screen. To finalize this process click the OK button.
Hide Inactive Activities
If you have activities that are not active - as determined by your “selected” options for the current Semester, mentioned in detail later -, you can hide and pin the active view grid to show inactive activities or not.
When the pin is like this, it is in an unpinned state:
 To hide inactive activities, click the checkbox. If you want to pin to always hiding inactive activities, click the checkbox and click the pin. It will then display in a pinned state.

DUPLICATING ACTIVITY ASSIGNMENTS
Once you have assigned the activities to a tutor, then you can duplicate those assignments to one or more other tutors automatically by clicking the Duplicate Assignments button. To duplicate assignments, click on the tutor whose assignments you would like to duplicate and then click the Add/Remove Assignments button.

Click the Duplicate Assignments button to open a list of tutors. Select all the tutors you want to have the same schedule and then click the Close button:

The system will check to make sure you are not creating orphaned appointments by duplicating the assignments. If appointments will be orphaned, the assignments will not be copied for the tutor or tutors that would cause that condition. A confirmation message will then appear where you can confirm that you want to duplicate the assignments. Click Yes to complete the action or No to cancel it.

Now you can search for a tutor to whom you duplicated the assignment list to see they have the same assignments.
ENTERING TUTOR SCHEDULES
Module: Users »Tutors
Purpose: Enter and modify tutor’s schedule.
Access: From Tutors screen.

Before using the appointments scheduling module, you will need to tell AccuSQL or AccuTrack the work hours of your tutors. You can also create regular (semester) schedules, custom schedules, and off times for tutors. These options are discussed in more detail in the sections that follow.
Scheduler (Classic)
Use the Scheduler (Classic) button if you want to have an easy way to drag the tutor schedules into the days of the week indicating when tutors will be available for appointments. The Scheduler (Classic) is used to creating recurring schedules through the end of the current semester. However, if you need to create custom schedules that change from week to week or month to month, you can define the regular semester schedule here, but then go create a custom schedule over top of this “semester schedule” using the Tutor Schedule button.

On the left of the screen, you will see the tutor you are currently working with. The list box next to it shows the activities assigned to the selected tutor. To the right of this list box, you will see the “Hours” list box. You can use this box to select the work hours for the tutor. On the right side of the screen, you will see seven small boxes representing the days of the week. The selected tutor’s work hours are dragged into these boxes.
Entering Tutor Schedule
To enter the schedule for a tutor, follow these steps:
- Select the time period of the first shift in the Hours list box. For example, if the tutor is scheduled to work 8:00 AM to 12:00 PM, click on the 8:00 AM time with the mouse, and press the Shift key and hold it down and then click on the 12:00 PM time. This will highlight all of the time values between 8 AM and 12 PM.
- Drag the highlighted time to the appropriate day list box. For example, If the selected tutor works 8 AM to 12 PM Mondays, Wednesdays and Fridays, click on one of the highlighted times above once with the mouse and hold the left mouse button down and move the mouse pointer to the Monday list box and let go of the mouse button. You will see the hours 8:00 AM to 12:00 PM appear in the Monday box. Next, drag and drop the same value to the Wednesday and to the Friday boxes.
- Enter the rest of the times following steps 2 and 3 above. For example, if the tutor works from 1:00 PM to 5:00 PM on Monday, Wednesday, and Friday, follow the steps to add this time period to the appropriate day boxes.
- Click on “Save” to keep the changes.
Adjusting Tutor Schedule
You can add hours to an entered schedule by simply dragging the new time and dropping it in the appropriate day box. To remove a time period from one of the Day list boxes highlight the period then press the Delete key on your keyboard. Click on “Save” to keep the changes. You can use the History and Appointment buttons at the bottom of the screen to see the past sign-ins and scheduled appointments by students for the selected tutor.
Allow Tutor to change own Availability
You can enable tutors to access to create their own custom schedules using either AccuSQL or Web Gateway MVC. If enabled, tutors can use the Schedule button from the Tutor Pad in AccuSQL to set their schedules on a weekly basis, or in Web Gateway MVC, they would use the Custom Weekly Availability option to set their weekly schedules. Any schedules created by the tutors using this method will be added as automatically as Custom schedules in the Tutor Schedule screen.
There are three options for determining if tutors can set their own custom schedules or not. Use configuration settings will apply the rules for the tutor as determined by the Appointments Options » Allow tutor to change their own availability X days in advance settings. By selecting Yes; this means the selected tutor can add their own schedule regardless of the Appointments Options » Allow tutor to change their own availability X days in advance settings. By selecting No; this means the selected tutor cannot add their own schedule regardless of the Appointments Options » Allow tutor to change their own availability X days in advance settings.
Tutor Schedule screen
The Tutor Schedule screen is used if you would like to define a regular (semester) and/or a custom schedule for the tutor. For tutors to show in in the students picklist when they sign in to AccuTrack/AccuSQL or when they schedule an appointment, the tutors must typically have two items: activity assignments and schedule
After you select a tutor in the Tutors, screen, click the Tutor Schedule button to open the screen where you can enter the tutor’s availability using this option.

To enter a Regular (semester) schedule for the tutor, perform the following steps:
- Make sure you have REGULAR selected in the Schedules grid.
- Click your mouse button in the bottom day and time grid to drag the schedule for the tutor into the grid. You SHOULD NOT click Add first, jut directly drag in the grid (Add is used to add a custom schedule only).
- Click Save.
- In the following example, the tutor has a schedule for 8 AM to 12 PM, then an hour off then from 1 PM to 6 PM.

DUPLICATING A SCHEDULE
Once you have created a REGULAR schedule for a tutor, then you can duplicate that schedule to one or more tutors automatically by clicking the Duplicate Schedule button. To duplicate a schedule, click on the tutor whose schedule you would like to duplicate and then click the Tutor Schedule button.
Click the Duplicate Schedule button to open a list of tutors. Click the tutors you want to duplicate the REGULAR schedule to and then click the Close button:

The system will check to make sure you are not creating orphaned appointments by duplicating the schedule. If appointments will be orphaned, the schedule will not be copied for the tutor or tutors that would cause that condition. A confirmation message will then appear where you can confirm that you want to duplicate the schedule. Click Yes to complete the action or No to cancel it.

You can select a tutor to whom you duplicated the schedule and then click the Tutor Schedule to see the results.
ADDING A CUSTOM SCHEDULE
The Default option in the Schedules grid shows the REGULAR “semester” schedule (if any) for the tutor as defined in the Tutor Schedule screen. To add a Custom Schedule for a specific date range, click the Add button. In the From and To boxes click the start and end date for this schedule (or can be for a week, a month, or whatever range works for you) and then you will drag in the grid for when the tutor works for that date range then click Save. Look at the display below the grid to see the time you are dragging for. Now click Add again and go through the same process for the next From and To the period of time (if necessary) until you have built the schedule the way you want. In the following example, the tutor has a REGULAR schedule from 8 AM to 12 PM and then 1 PM to 5 PM. If however, you click on the Custom schedule in the grid, the tutor works also from 6 PM to 7 PM from May 4, 2020, through May 15, 2020.

Green in the grid indicates you are scheduling the tutor for both drop-in only (one on one) and group appointments. You can choose the Schedule as radio buttons on the bottom left of the screen to create the time as something different than that. In the Schedule for: area, you can specify the tutor schedule for a specific activity and/or service. That means the student will only see the tutor as available if they select that specific activity and/or service and 1) the tutor has that activity assignment and 2) the tutor has that specific activity scheduled here. In the following example a tutor has a REGULAR schedule from 8 AM to 12 PM then 1 PM to 5 PM. From May 4, 2020, through May 15, 2020, she also works from 6 PM to 7 PM. On, April 20, 2020, through April 24, 2020, she is only available from 2 PM through 4 PM for “Supplemental Instruction” Service since a specific activity was selected for that Custom schedule.

And finally, the same tutor is available from all day from February 10, 2020, through February 14, 2020, but only for One-on-one appointments (Exclusive Only) for Personal Research.

ALLOW TUTOR SCHEDULING USING WEB GATEWAY MVC
Web Gateway MVC is a plugin module for AccuSQL that allows students to schedule appointments, register for seminars/workshops, take surveys, and more all from the convenience of a web browser. You can now allow tutors to create their own “semester” or custom schedules through Web Gateway. These schedules are then reviewed and approved by AccuSQL admins.
![]() Video Learning Series: Allowing tutors to set schedules using Web Gateway MVC
Video Learning Series: Allowing tutors to set schedules using Web Gateway MVC
View video at: https://www.youtube.com/watch?v=HI9XWEt-uqo
INSTRUCTORS
Module: Users > Instructors
Purpose: Enter activity (course) instructors.
Access: From Users click on Instructors.
There are at least five advantages of entering instructors in AccuSQL or AccuTrack:
- To generate a report for each instructor detailing the activity of his or her students. For example, if you have an ESL instructor that gives her students extra credit for attendance at your lab, you can generate a report for that instructor detailing her students’ attendance.
- You can schedule reports to go out to all your instructors for the dates and times you specify and for a particular period of time using the Set schedule for instructor’s attendance reports screen in the Control Panel » Activity Screen Options menu.
- To show the instructors for a class in the Activity Selection screen. This will help the students identify their class for selection.
- To print out address labels for instructors
- You can have tutors email their session notes directly to the instructors after they record them.
To enter instructors, click Users » Instructors:

The list box in the center of the screen displays the current instructors. To add a new instructor, click Add and type his or her name in the text boxes. You can also enter the instructor’s address and email address. Click on the “Add” button to complete the entry. The name will move from the text boxes to the list box. Note: To edit an instructor, double click on the name in the list box. The data will be copied to the text boxes where you can make the changes. Click the “Save” button to keep the changes. To delete a name in the list; highlight it and, then click on the “Delete” button. AccuSQL or AccuTrack will ask you to confirm before proceeding with the deletion.
![]() Video Learning Series: Using Instructor Selection
Video Learning Series: Using Instructor Selection
View video at: https://www.youtube.com/watch?v=13_8xllKe6Q
SYSTEM ADMINISTRATORS
Use this option to add new system users to AccuSQL or AccuTrack and assign them to Access Groups. This option is discussed in detail in the System Access >> System Administrators section of this document.
STUDENT GROUPS
Purpose: To create groups of students.
Access: From System Administration, click on Users » Student Groups.
![]() Video Learning Series: Creating & Using Student Groups
Video Learning Series: Creating & Using Student Groups
View video at: https://www.youtube.com/watch?v=XEl4sbwmFAQ
On this screen, you will be able to group students by some kind of classification you can create for your needs. For example, you may have a group of First Year, or At-Risk students that you would like to add to a group. The groups you create can be used in several places, perhaps most importantly as a report filter. For example, you could run a Zero Visits report for students in your At-Risk group to determine who may be in need of intervention. Student Groups are used in numerous places throughout the software, including:
- Student groups can be used as a report filter in numerous reports.
- You can register student groups to activities.
- You can manually sign in student groups.
- You can message student groups.
- You can present custom surveys to student groups.
- You can limit seminar registrations for specific members of student groups.

You will notice a list of groups on the left. When you select one of the groups, its members are shown in the “Selected” box.
Adding a Student Group
To add a new group, click on “Add” and enter the group name. Next, select the students you want to add to this group using the Selection List Boxes control. Click the “Save” button to add your entry.
Editing a Student Group
To edit a group record, highlight the group by clicking on it. If you don't see the group, use the up and down buttons in the vertical scroll bar to find it. To edit the record, click on the “Edit” button. The group's description will be copied to the text boxes. Make your changes there and add or remove group members if needed. Click on the “Save” button to keep the changes, or click on the “Cancel” button to keep the data as is.
Deleting a Student Group
To delete a group, highlight the group, and then click on “Delete”. You will see a confirmation message. Click “Yes” to delete the group.
Setting Group Members to Inactive
If you click the Set Group Members to Inactive button, you can set every member of the Student Group to inactive. Setting to inactive will inactivate the student record for each student in the group. Remember, if students are set to inactive you will still retain all of their sign-in and other data, but they will be unable to sign into the system.
STUDENT-ATHLETES
Purpose: To add and edit Sports for athlete tracking and required hours.
Access: From System Administration, click on Users»Student Athletes.

To register a student in a sport, use the Selection List Boxes control. Start by selecting the sport from the Sport drop-down box. If you do not have any sports defined, you will need to click Modify Sports to create them (discussed in a minute). Next, select the students that are members of the selected sport by moving their names to the “Selected” box on the right. Finally, click on “Register”.
To drop a student, simply move the name back to the “Not Selected” box and click on “Register”.
Adding a Sport
To add a new sport, click the Modify Sports button, click the Add button, fill in the sport’s abbreviation, and then the description. Click the “Save” button to save your entry.

Editing a Sport
To edit a sport, highlight the sport by clicking on it. To edit the record, click on the “Edit” button. The sport's info will be copied to the text boxes. Make your changes there and then click on the “Save” button to keep the changes, or click on the “Cancel” button to keep the data as is.
Deleting a Sport
To delete a sport, highlight the sport, and then click “Delete”. If this sport does not have any registrations, you will see a confirmation message. If you answer “Yes”, the sport will be deleted.
If the sport has students registered to it, AccuSQL or AccuTrack will display a message:
 The message above says that this sport has registered students. If you answer “Yes”, AccuSQL or AccuTrack will delete the sport's record and all related records.
Required Hours Screen
Purpose: To add required attendance hours for each student athlete.
Access: From System Administration, click the Student Athletes » Required Hours button.

Use this screen to indicate the required weekly attendance hours per student-athlete. Start by selecting the sport from the Sport drop-down box. Next select one or all athletes registered to this sport by using the Selection List Boxes control. Next, select the weeks you want to assign hours using the selection grid on the right. Finally, select the number of required hours you want to assign using the spinner box. Click on “Save” to record your changes. To see the assigned hours, select the sport and then click on “Current Assignments for this sport”. This will show a screen like this:

This screen shows each student with assigned hours. For each student, the screen shows the required weekly hours. Click on “Done” to close this screen.
GRANTS RECIPIENTS
Purpose: To define the grants for specific students and activities.
Access: From System Administration, click Users»Grants Recipients.

Use this screen to record your grant’s assignments. To add a new assignment, click on the “Add” button. Select the student by using the … button next to Student. Select the class by using the “…” button next to the “Activity” box. Finally, select the grant by using the “…” button next to the Grant. If you like, you can also add notes in the Notes box. To keep your changes click the “Save” button. If you do not have any grant types defined yet, click the Modify Grants button (discussed in the next section).
To edit a grant assignment, select it from the list box and then click on the “Edit” button. Make your changes and click on the “Save” button.
Modify Grants
To create new grant types, click the Modify Grants button from the Grants Recipients screen.

To enter a grant, click on “Add”, type the grant’s name, and enter any comments you like. Click on “Save” to add the grant:
To edit a grant, select it from the list box located at the top of the screen and click Edit. Make your changes and click on “Save”.
TUTOR GROUPS
Purpose: Create groups to place your tutors into.
Access: From System Administration, click Users»Tutor Groups.

The tutor group option allows users to place tutors into different categories. This feature is useful in separating full-time from part-time tutors, social sciences tutors from math tutors, etc. The tutor groups can then be used to filter certain reports, for group messaging, and more.
Adding a Tutor Group
To add a new group, click on “Add” and enter the group name. Next, select the tutors you want to add to this group using the Selection List Boxes control. Click the “Save” button to add your entry.
Editing a Tutor Group
To edit a group record, highlight the group by clicking on it. To edit the record, click on the “Edit” button. The group's description will be copied to the text boxes. Make your changes there and add or remove group members if needed. Click on the “Save” button to keep the changes, or click on the “Revert” button to keep the data as is.
Deleting a Tutor Group
To delete a group, highlight the group, and then click on “Delete”. You will see a confirmation message. Click “Yes” to delete the group.
Setting Group Members to Inactive
If you click the Set Group Members to Inactive button, you can set every member of the Tutor Group to inactive. Setting to inactive will inactivate the tutor record for each tutor in the group. Remember, if tutors are set to inactive you will still retain all of their sign-in and other data, but they will be unable to sign into the system.
Previous - SYSTEM ADMIN SCREEN | TABLE OF CONTENTS | Next - USERS SETUP OPTIONS