meta data for this page
ACCUTRACK SYSTEM SCREEN
When you click on System from System Administration screen, you will see the following options:
- Semesters: Use to create the From and To date ranges for your various semesters.
- Off Times: Allows you to create off times for the entire center. Students will not be able to schedule appointments during center off times.
- Rooms: Allows you to create rooms that can then be used during appointment scheduling.
- Lab IDs: Used to create local labs.
- Remote Shutdown Stations: Used to shut log off or shutdown computers connected to AccuSQL/AccuTrack.
Note: Based on Windows or Group Policy security settings, this may not be functional in all environments. - Export Reports: Allows you to export any custom or memorized reports to a file where they can then be imported by other AccuSQL/AccuTrack users.
- Import Reports: Allows you to import custom or memorized reports created by other AccuSQL/AccuTrack users into your reports.
- Scheduled Tasks: Allows you to see the setup of the scheduled tasks in Windows Task Scheduler by AccuSQL/AccuTrack.
SEMESTERS
Purpose: To establish the Semesters for reporting periods and the Categories and Activities that will be available during those Semesters.
Access: From System Administration, click on System > Semesters.

This is an important screen as it allows you to define your semesters and assign them activities.
Adding a new semester
To create a new semester, follow these steps:
- Click on the Add button, type the description of the new semester in the text box, and enter the Start and End dates.

- Select the activities that will be offered during this semester by using the Activities Mover List control to move activities to the right (Selected) grid.

- Click the Save button to create the new semester.

Modifying a semester
To modify an existing semester, first, highlight the semester in the list, and then click the Edit button. You can also double click on the semester's name to edit it. Make your changes and then click the Save button.
Deleting a semester
To remove a semester completely, click Delete. Any activity assigned to that semester will also be removed from the semester.
Registering activities to a semester
To register activities to a certain semester, edit the semester then move the activities from the Not Selected list to the Selected list by using the Selection List Boxes control. Once you have all the desired activities in the Selected list, click “Save”. The Activities Count box at the bottom left side of the screen will show the number of selected activities (classes).
OFF TIMES
Purpose: To enter time periods during which appointments will not be offered.
How to Access: From System Administration, click on System > Off-times.
On some occasions, your center will not be available for appointments (e.g. school holidays).
Use this screen to enter these time periods. The periods you enter here will not be available for appointments.

The screen lists defined off periods. To enter a new period, enter a description and select the start and end time. Click on Add to complete the entry. To delete an off time, highlight it in the list by clicking on it then hit the Delete button. You can also edit the off-time by clicking on Edit, making the changes, then clicking on Save.
ROOMS
Purpose: To add rooms that can be selected by admins or tutors during appointment scheduling.
Access: From System Administration, click on System > Rooms.


Adding a new room
To create a new room, follow these steps:
- Click the Add button, type the room’s name, the location and the capacity (number of students that the room can hold). These text boxes are below the Rooms list:
- Indicate whether the room can be shared with different activities by checking the appropriate box:
- After you enter the required data, click the Save button to create the new room.
Modifying a room
To modify an already registered room, first, highlight the room in the list, then click on the Edit button. You can also double click on the room's name to edit it. Make your changes and then click on the Save button.
Deleting a Room
To remove a room completely, select it and click on Delete.
LAB IDS
Purpose: To enter IDs of different labs sharing the same database.
How to Access: From System Administration, click on System > Lab IDs.
If you are planning on using AccuSQL/AccuTrack in different areas (Advising, Physics Tutoring Center, IT Services, etc.) or in multiple labs (e.g. Math Lab, Writing Lab), and you want all these areas and labs to share the same database, you will need to set up these areas inAccuTrack/AccuSQL.
Using local labs, you can have a different set of:
- Sign-in Setup options
- Available Activities (courses) displayed
- Student Demographics or Profile Questions and answers
- Custom Surveys
Additionally, you can have a different:
- Look and feel for each lab
All these unique options can be store in one AccuTrack/AccuSQL database.
AccuTrack/AccuSQL knows which lab information to display by you setting the local lab assignment on the sign-in stations to the local lab where that sign-in station physically resides. For example, if you are setting up a Math Lab and a Writing Lab, you would create each local lab and set them up the way you want, and on the computer that is used for students to sign in in the Math Lab, you would set that computers local lab assignment to Math Lab in AccuTrack/AccuSQL. In the Writing Lab, you would set the lab on the Sign-in Station to Writing Lab. A more detailed example of local labs appears later in the section.
When thinking about whether or not to use local labs, you need to keep a few things in mind. Local labs have some advantages and also some disadvantages. If you have various centers and they are not concerned about each other - for example, your Advising Center is collecting its own sign-ins and is not interested in running reports for what is happening in the Tutoring Center - your best approach would not be local labs at all, but instead two different databases.
Advantages of Using Local Labs
The main advantage of using local labs is the ability to filter report information based on sign-ins in those labs. For example, you might have a Math Lab and a Tutoring Center that offers help with College Algebra. Using local lab assignments, you can filter reports based on who received College Algebra help in either the Math Lab, the Tutoring Center, or both. SO, since you are using one database, if you need to run reports for the Math Lab and Tutoring center, you could do so without changing the database you where you are connected to in AccuSQL/AccuTrack. Since most items in the system are configurable at the Local Lab or Center-level using two different databases as an approach would not be necessary.
Another advantage of using local labs is the ability to change the sign-in workflow for various labs. For example, you could have a Tutoring Center and a Computer Lab. In the Tutoring Center, you could have the students select from their registered courses and select services, then select an available tutor and maybe even be put in an intake queue until they are called to be helped. In the Computer Lab, you could have the students sign-in and pick no activity, service, or tutor at all. The reason you want to have this setup is that most of the settings and options in the Control Panel can be applied individually to the various labs you have licensed in the system.
Creating a Local Lab
Purpose: To create an new Center that you have licensed through Engineerica.
How to Access: From System Administration, then click the System > Lab IDs button.

To Add a new lab, simply click Add and type in the lab’s ID, Name, and click the Save button.
To Edit an existing lab ID, select it in the list at the top of this page and click the Edit button, make any needed changes to the Name (displayed to students) or Lab ID (Used for imports and on some Admin screens), and click Save.
View/Modify Local Lab ID
To view or set the local lab ID, click on the View/Modify Local Lab ID button. This option tells the computer that you are on that it is going to be assigned to use the local lab configuration settings for a specified Lab/Center.
- Click the View/Modify Local Lab ID (first large) button on the bottom portion of the screen.
- Next, in order to set the Local Lab/Center that you want to assign the computer click the Change to: drop-down box and select the local lab from the list
- And finally, click Save to complete the Lab/Center Assignment.

You will get a confirmation box. Click Yes to set the local lab to the one you selected.

View/Modify Activities held in this lab
To view or set activities held in this lab, click on the desired Local Lab/Center in the grid, and then click on the View/Modify Activities held in this lab button. The activities that will be available for students to sign into in that lab will be displayed in the lower Assigned Activities grid. You can move activities to the Assigned Activities grid by double-clicking on the upper grid. You can also use the Shift key to select a block of activities or the Ctrl key to select multiple records. After you have selected the activities you want, click the down arrow to move them either to the Assigned Activities grid or from the Assigned grid back to the upper available Activities grid.

View/Modify Services held in this lab
You can assign specific Service Types that will appear for students to select at sign in for the Local Lab/Center. To view or set services held in the lab, click on the desired lab in the grid, and then the View/Modify Services held in this lab button.

Move the services you want to be available in the Local Lab/Center into the Assigned Services grid (on the right) and then click OK.
Local Lab Usage Example
In the following example, a “Computer Lab 1 (COMP LAB)” Local Lab/Center has been created.

The Activities that will be available in the “Computer Lab 1” have been created using the Sign-in Setup > Categories & Activities screen. The Activities are all entered under a Category called “Computer Use”.

Now back in System > Lab IDs, the Activities that will be available in the “Computer Lab 1” has been added using the View/Modify Activities held in this lab screen.

Specific Service Types that will be available in “Computer Lab 1” have also been added using the View/Modify Services held in this lab screen.
To make it easy to set up the various options for the “Computer Lab 1”, the View/Modify Local Lab ID has been set to “Computer Lab 1 (COMP LAB)”.

Now the options for how students will sign into the “Computer Lab 1” are setup using the different Sign-in Setup > Setup screens. The Welcome Message Options - Welcome Message is entered as “Welcome to Computer Lab 1” and the announcements have also been edited accordingly.
In the Activity Screen Options, then various labels have been changed. In addition, the Service Type selection has been enabled.


Finally, in the Tutor Selection Screen Options, selecting a tutor has been disabled completely.

In the System > Setup > System Options, the background for the “Computer Lab 1” was changed as well.
Now when a student signs into the “Computer Lab 1”, it will appear like this:


Now I can run reports for what is happening specifically in the “Computer Lab 1” using the Lab IDs report filter and setting it to “Computer Lab 1”.
REMOTE SHUTDOWN STATIONS
Purpose: To display information about computers sharing the database and to remotely shutdown administrator computers for maintenance.
How to Access: From System Administration, click on System > Remotely Shutdown Stations.
Use Remote Shutdown to see which administrator computers are currently logged into AccuSQL/AccuTrack and to initiate remote shutdowns of those computers.

To make it more convenient for you to run database operations, this screen will display the computer stations currently sharing the database and it will allow you to exit AccuSQL/AccuTrack on these stations.
The SuperTable on this screen lists all computers using the database. This includes the computer’s name, the user’s name, the time AccuSQL/AccuTrack was launched on that computer, and the Ethernet address of the computer running AccuSQL/AccuTrack. This list will periodically refresh itself.
To exit AccuSQL/AccuTrack on the other computers, set the following values:
1) Method of shutdown:
You have 4 methods available: Exit AccuSQL/AccuTrack only, log off from Windows, reboot the computer, or shutdown the computer. However, the last three methods might fail if the Windows account running AccuSQL/AccuTrack on these stations does not have enough privileges to carry out the shutdown command. For example, Windows policies might block shutdown of the computer. In this case, AccuSQL/AccuTrack will simply exit on these stations.
2) Time in seconds users are allowed to save their work:
Use this spinner box to indicate how many seconds you want to give users before exiting. In other words, this defines the countdown timing for exit. During this time users that they might be using AccuSQL/AccuTrack can finish what they are doing and exit. Add roughly 30 seconds to time you define here before all stations will be off. For example, if you use 60 seconds, expect all stations to be off in 90 seconds.
3) Time in minutes you plan to hold users off:
Use this spinner box to indicate how many minutes you plan to run the maintenance operations. During this time, users will not be allowed to launch AccuSQL/AccuTrack on other computers. Use higher values than what you estimate you will need. For example, if you think you need to keep users off for 10 minutes, use a value like 15. If you finish the maintenance work earlier you can click on the Stop Remote Shutdown button or exit and restart AccuSQL/AccuTrack to allow other users to launch AccuSQL/AccuTrack.
After selecting the shutdown method, count downtime, and how long you need everyone off the database, click the “Start Remote Shutdown” button. Other users of AccuSQL/AccuTrack will see the following box:
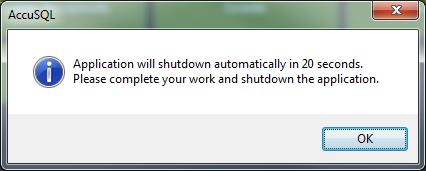
The countdown will continue on this box. To stop the countdown message, users can click “OK” and finish their work. If the users do not exit the software, or if the station is not being used, AccuSQL/AccuTrack will exit when the time expires. If the user tries to log back while the maintenance window is still in effect, a message will appear indicating maintenance is still in progress.
EXPORT REPORTS
Purpose: Exports student and tutor reports to hard drive.
How to Access: From System Administration, click on System > Export Reports.
Use Export Reports to save any customized or memorized reports to a file that can then be imported by other users. This is helpful if you are not all using the same application shared path, or using different databases, but want to share your customized or memorized reports with others. You can also use this feature if when you created the report, you made it only available to yourself but now you want others to be able to use it.
After you click Export Reports, you will see a screen where you can click the reports you want to include for the export. If you right-click in the grid, you can choose the Select all option to export all the reports.

Next, when you have selected the reports you want, click Close and you will be presented with a Save As screen. Navigate to where you want to save the reports and click the Save button.
IMPORT REPORTS
Purpose: Imports data and reports from hard drive into AccuSQL/AccuTrack.
How to Access: From System Administration, click on System > Import Reports.
Use Import Reports to import any customized or memorized reports created by other users of AccuSQL/AccuTrack. If, for example, an AccuSQL/AccuTrack admin using a database in the math lab created a custom report, and you would like to use it for your tutoring center database, the person in the math lab could export the report and then you can use this option to import it so it will be available in your own Customized Reports report list.
After you click Import Reports button, you will be presented with a Select report package to import screen. Navigate to where the EXPORT PACKAGE.RXP file is located and select it and click OK.

A grid will appear where you can select the reports you want to import. If you right-click in the grid, you can select all the reports. After you have selected the reports you want to import, click Close.

The package will then import all the selected reports and ask if you want you can delete the report package or keep it.
SCHEDULED TASKS
This section shows you the setup of the AccuTrack/AccuSQL scheduled tasks in Windows Task Scheduler on this computer or on other computers. The scheduled tasks in this section that appear as bold have not been set up or have not been set up on this computer. If they are not bold then the Scheduled Tasks when selected will display the details of its operation.
NEW AUTOMATED TASK SCHEDULER – ACCUTASK SCHEDULER
Purpose: Set automated or scheduled tasks for Appointment Reminders, Auto-Sign-Out, Late Media Reminders, No-Show Reminders, Periodic Imports, Scheduled Instructor Reports, Scheduled Reports, Seminar Reminders, and Success Plans Messaging.
How to Access: From System Administration, click on System > Scheduled Tasks.
AccuTaskHandler Setup for AccuSQL 2018 or later
OR
AccuTaskHandler Setup Guide (PDF)
Once completing the required install above click on Scheduled Task button to launch the Scheduled Tasks screen. From this screen, you can select which task you would like to set up as an Automated/Scheduled Task using Windows Task Scheduler.

By default, it will open to the General tab where you can change Security settings.

You can then click on the Triggers tab to adjust the schedules as needed.

No other screens need to be adjusted so when you have completed this setup simply click the OK button and enter any necessary passwords it needs to save the task.
Previous - COMPUTER RESERVATIONS | TABLE OF CONTENTS | Next - SYSTEM SETUP OPTIONS