meta data for this page
![]()
General Menu | Next - Import Data
Accudemia Data Exchange (ADX)
Installing/Uninstalling ADX
Use ADX Accudemia Data Exchange to upload your college database.
In order to start, you need to download ADX while logged into Accudemia under Advanced > Import

The following options are the minimum system requirements and compatibility to install and use ADX.
System Requirements
- Computer: PC with a Pentium class processor.
- Peripherals: A keyboard and a Mouse or pointing device
- Memory: 3 GB or higher recommended
- Hard disk space: 10 GB of free hard drive space.
- Video: 1024 x 768 resolution. High color 16-bit recommended
- Operating System:Microsoft Windows XP or later. (This includes Windows Vista, Windows 7, Windows8, Windows 8.1, Windows 10, and/or Windows Server 2008, Windows Server 2012, Windows Server 2016, Windows Server 2019, Windows Server 2022)
Software Requirements
- .Net Framework 4.8 installed: ADX requires this framework to work correctly; when you install/update ADX it should also install this framework.
To start installing the software, click on the following link (or copy and paste it in the browser's address bar if it doesn't work):
http://install.accudemia.net/Files/?f=AccudemiaDataX_x86/setup.exe
Click on the setup.exe file that can be found in your downloads folder or on your browser.

If you get a warning message, you can click the "Run Anyway" and then "Install" when asked.
Follow the on-screen instructions to install ADX.
To uninstall ADX:
In Windows XP:
- Go to the Control Panel:
- Click the Start button
- Select Control Panel
- View the list of programs:
- In Windows XP, click the Add or Remove Programs link
- In the list of programs now select “Accudemia Data Exchange”.
- Start the removal process:
- In Windows XP, to the right of the program name, click the Remove button
- Select the “Remove the application from this computer” option and click OK.
- Follow the prompts until the uninstall process completes.
In Windows Vista/7:
- Go to the Control Panel.
- Click the Start button.
- Select Control Panel.
- View the list of programs.
- In Windows Vista/7, under Programs, click the Uninstall a program link.
- In the list of programs now select “Accudemia Data Exchange”.
- Start the removal process.
- In Windows Vista/7, above the list of programs, either click the Uninstall button or click the Uninstall/Change button.
- Select the “Remove the application from this computer” option and click OK.
- Follow the prompts until the uninstall process completes.
In Windows 8:
- Go to the Control Panel.
- On the Start screen, type: “control panel”, and click on the Control Panel tile.
- View the list of programs.
- In Windows 8, under Programs, click the Uninstall a program link.
- In the list of programs now select “Accudemia Data Exchange”.
- Start the removal process.
- In Windows 8, above the list of programs, either click the Uninstall button or click the Uninstall/Change button.
- Select the “Remove the application from this computer” option and click OK.
- Follow the prompts until the uninstall process completes.
In Windows 10:
- Go to the Control Panel.
- Click Cortana, type: “control panel”, and click on the Control Panel tile.
- View the list of programs.
- In Windows 10, under Programs, click the Uninstall a program link.
- In the list of programs now select “Accudemia Data Exchange”.
- Start the removal process.
- In Windows 10, above the list of programs, either click the Uninstall button or click the Uninstall/Change button.
- Select the “Remove the application from this computer” option and click OK.
- Follow the prompts until the uninstall process completes.
Backup/Restore your ADX configurations
In order to backup your import job configurations and login credentials stored in your current ADX installation you'll need to do the following:
- On the machine where you have ADX currently installed and configured press the Windows Logo key + R to open the run dialog box.

- Type:
C:\Users\%username%\AppData\Local\Apps\2.0\Data\
where %username% should be automatically replaced with the name of the Windows User Account you're logged into the PC currently.
- You'll notice inside this folder there will be several uniquely numbered folders per ADX installation. Search for and locate a file labeled APPLICATION.FDB inside of one of these sub-folders.

- Now select the file, right-click it, and select Copy.
(If you find more than one of these files choose the one with the latest date) - Finally right-click the location you want to backup the configuration file and select Paste to backup this APPLICATION.FDB file in a safe location where you want to it saved (a network share or another server).
Now to move the configurations to another machine, you need to put that file in another ADX installation. To do so, do the following:
- First, download and install ADX on the new machine.
- From the new machine locate the APPLICATION.FDB file from the saved safe location.
- Now right-click and choose to copy the backed-up APPLICATION.FDB file.
- On the new machine press the Windows Logo key + R to open the run dialog box.
- Type:
C:\Users\%username%\AppData\Local\Apps\2.0\Data\
where %username% should be automatically replaced with the name of the Windows User Account you're logged into the PC currently.
- You'll notice inside this folder there will be several uniquely numbered folders per ADX installation. Search for and locate a file labeled APPLICATION.FDB inside of one of these sub-folders.
- Finally right-click in the folder location and paste the APPLICATION.FDB file you have backed up to replace the APPLICATION.FDB file you just found on this new PC.
Scheduled Imports / Automated Exports
In this section you'll learn what you need to do in order to schedule imports or exports. There are some prerequisites that we'll review as well in order to complete this process. All of these have been explained above but you can review these are the prerequisites links:
- Download and install ADX (Accudemia Data eXchange).
-
- Scheduled Import Options:
- Any Import Type
- Scheduled Export Options:
- All Users - Lists all users in the system, including some useful information such as email, address and phone number.
- Students - Lists all students in the system, with detailed information.
- Tutors - Lists all tutors in the system, with detailed information.
- Instructors - Lists all instructors in the system, with detailed information.
- Classes - Lists all classes in the system.
- Subject Areas - Lists all subject areas in the system.
- Student Enrollment - Gets all students and the classes where they are enrolled.
- Tutor Assignments - Lists all tutors assigned to a subject area, and their assignment.
- Session Logs - Lists all session logs registered in the past, including the details of each one them.
- Last 7 Days Session Logs - Lists all session logs registered in the last 7 days, including the details of each one of them.
- Last Month Session Logs - Lists all session logs registered in the past month, including the details of each one of them.
- Last 3 Months Session Logs - Lists all session logs registered in the past 3 months, including the details of each one of them.
- Last 6 Months Session Logs - Lists all session logs registered in the past 6 months, including the details of each one of them.
- Last Year Session Logs - Lists all session logs registered in the past year, including the details of each one of them.
- All Appointments - Lists all appointments made in the past and in the future.
- Last 7 Days Appointments - Lists all appointments made in the last 7 days.
Once these are complete you should be able to schedule your import / export as explained below:
- Schedule Imports / Exports in ADX (Accudemia Data eXchange).
Prerequisite 1 - Download and install ADX
Step 1: When you log into Accudemia as a System Admin Go to Advanced > Imports

Step 2: Then under the “Get it Now!” Heading click on the following Icon:

Step 3: Follow the instructions to install. Then go ahead and store your login credentials on the first screen.

Prerequisite 2 - Setup an Import Job or Export Job
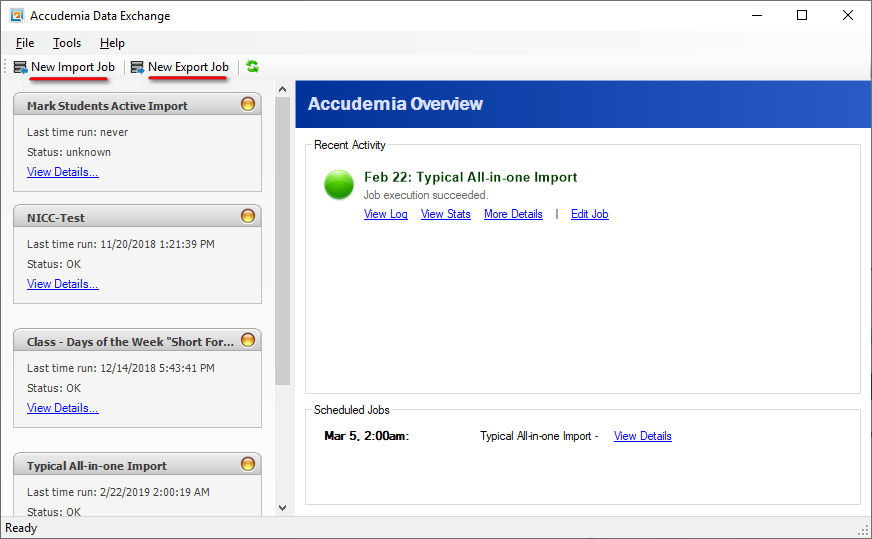
Step 1: Once logged into the software/school.accudemia.net site, click on either “New Import Job” or “New Export Job”:
Step 2: Once you click “next” on the first screen of the import/export wizard, either:
- Select the CSV file for the import OR
- Select the type of export job and the file location with the name you want to use for the export file
by clicking browse(…) button and when done finally click next button.

Step 3: Now if importing ADX wants you to map the fields with drop-downs to each of the ones in your CSV file. Click next when done.
Note: Exports will not have this step.

Step 4: Then it shows you the results of what it found to import, click on them to see what its pulling, then click next.
Note: Exports will not have this step.

Step 5: At this point it wants to know if you want to overwrite data I would have it set to append for now until ready for a new semester to overwrite. Click next.
Note: Exports will not have this step.

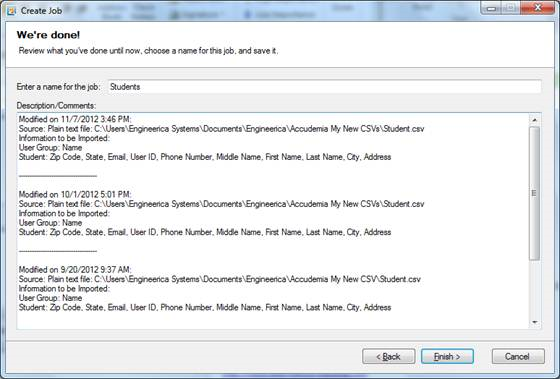
Step 6: Finally, name the Import Job or Export Job and click the Finish button.
Schedule Imports / Exports in ADX
Now that we know where and what data to pull/push we need to automate it.
Step 1: Start by clicking “view details” on left column under the import job and then under schedule “Enable “

Step 2: Then click the “new” button and setup your reoccurrences. Click “OK”.

Step 3: You should see the automated task setup to go for you and click “ok” and done.

Want to run the ADX Import/Export Job when you are not logged in?
If you happen to need to run the scheduled automated imports / exports when the user is not logged into the computer or server you'll need to go directly into the Windows Task Scheduler itself and set this permission by editing the properties of the ADX import job.
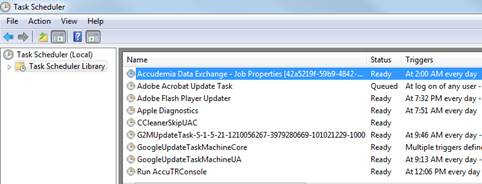
- First, open Windows Task Scheduler from the Windows Start menu or settings.
- Next, right-click the ADX Import job in the Task Scheduler Library window and select Properties.

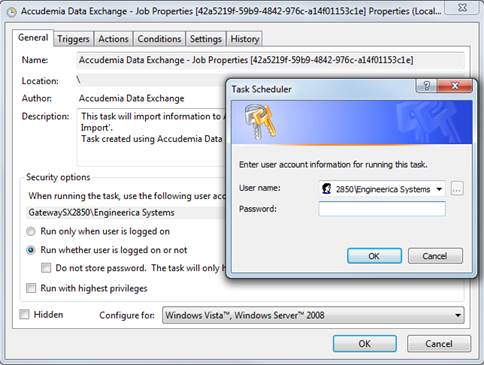
- On the General tab of the properties set the job to store your Windows User Credentials by selecting the “Run whether user is logged in or not” in the Security Options section.

- When you click OK at the bottom you'll now be prompted to enter and store your Windows User Credentials.
Other Options in ADX
In this section we'll explore the different options you have available in the ADX toolbars.
File
These are the typical actions you would perform in ADX:

Create New Import Job
Create New Export Job
Tools
These are some useful options available to you while working in the import/export tool.

Overview
This menu option takes you to an overview of the past ran jobs in ADX.
View Accudemia in Browser
This option passes over the credentials of the user currently logged into the ADX application to accudemia.net so they can look at account settings and import history without having to re-login.
View Accudemia in Browser
This option also passes over the credentials of the user currently logged into the ADX application to accudemia.net but take the user specifically to the import history on the server without having to re-login.
Change Accudemia Account
This option allows you to change/update/designate who is logged in to run the imports.
Options
This section gives you additional means to use, troubleshoot, and analyze import or export jobs that are having issues.
General Tab
This section allows you to email notifications about Imports/Exports failing or succeeding to a list of individuals by placing emails separated by a return in the textbox. If you want to email 2 people about only failures see below:

Plug-ins Tab
This section deals with setting up plug-ins that you have developed to integrate another system with ADX using our API. More information about this can be found here:
https://github.com/engineerica/accudemiaext/wiki

Logging Tab
This section allows you look at the current import/export logs to find the root cause of the import failing and can be used to troubleshoot with the Accudemia Support Team.

Help
In this section we'll find helpful links to support resources, software updates and version information.

Contact Support
This option will open an email addressed to our Accudemia Support Team in your computer's designated mail program/application such as Outlook, ThunderBird, etc.
Documentation
This option will direct you out to this guide. Congrats! You are already here. 
Accudemia Forums
This link will take you out to the Accudemia Forums to search for answers to frequently asked questions, view helpful tips, and interact with other registered Accudemia clients to see how they run imports, etc.
Check for Updates (Software Updates)
This link will check if that are any updates needed
About Accudemia Data Exchange
How do I find My ADX Version Number? This link will show the exact version number of ADX you currently have installed.
